Easy Two Color Mandala Tie Dye

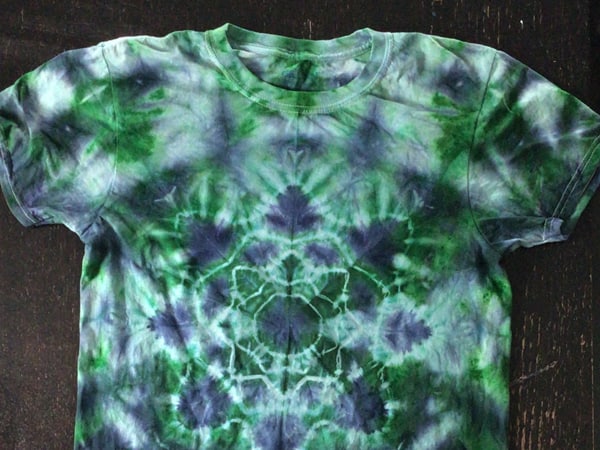
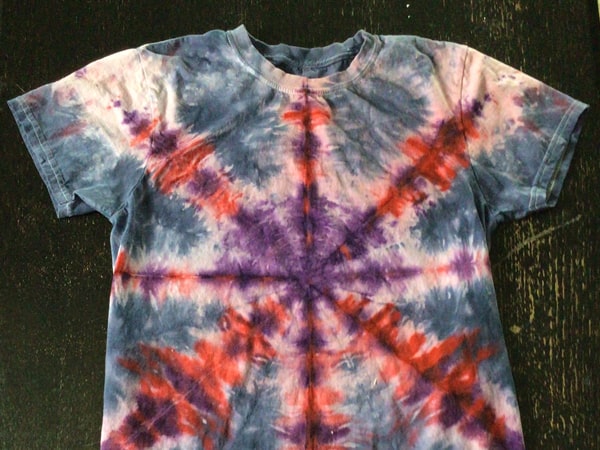
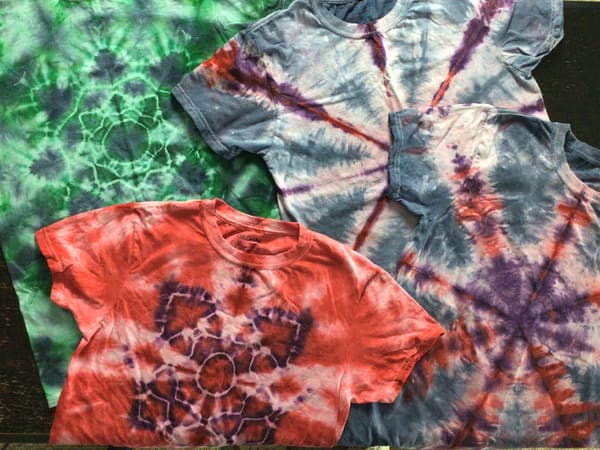
Mandala tie dye is one of the designs that look super impressive but are actually quite easy. This design is a simplified version that uses only two colors, simplifies the tying process, and uses beginner-friendly Rit dyes* so that you can learn all the basic skills to do a more complicated design but still get an awesome result on your first try.

Because of the limited colors and simple mandala, this design is a subdued version of the often intricate colorful tie dye mandalas. This makes a t-shirt that is not too flashy while still being a beautiful impressive work of art.

*This article contains affiliate links. This means if you purchase a product through one of the links with an asterisk (*) I will get a small commission at no extra cost to you. This is how I cover the cost of running a website and can continue to create content. Read more about the companies I work with here.

How To Tie A Mandala for Tie Dye

You need to start with a triangle fold. Since the triangle is the start for lots of tie dye projects I have the instructions for it on its own page. Learn how to make a triangle fold here.

You will also need some scissors and string. I like to use waxed thread* (which I use for bookbinding) because the wax helps keep the dye off the tied spots and makes it easier to pull super tight. You can make your own waxed thread or just use any regular sting as long as you pull it tight.

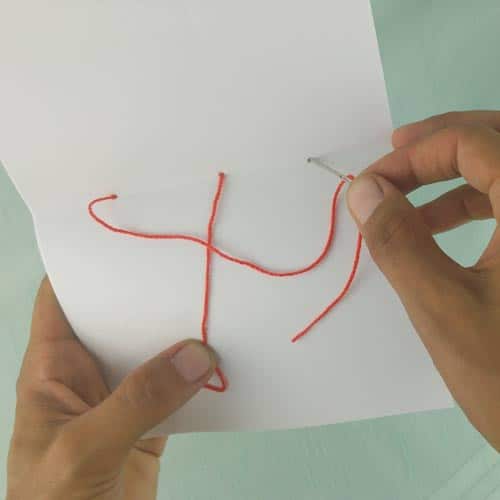
Make a slip knot and loop it around the point of the triangle. Pull tight. Wrap the thread around 5 to 20 times. The more times you wrap the thread the thicker the mandala design lines will be on the t-shirt.

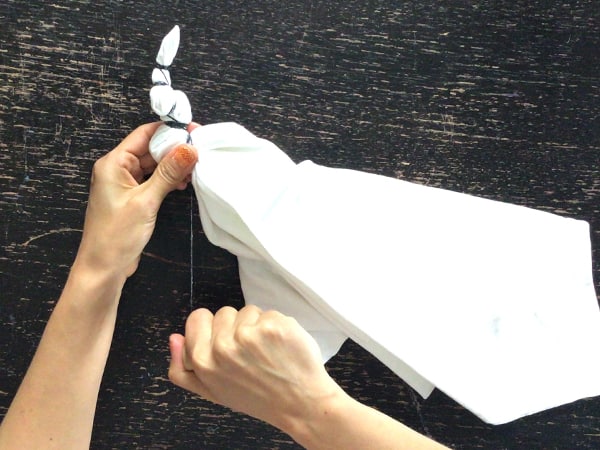
Move up the triangle a bit and begin wrapping. You can vary the angle of the wrapping and the distance between the wraps to make many interesting lines. The wraps can either touch or not (see the below picture where the first two wraps do not touch and the second two do to see what I mean).

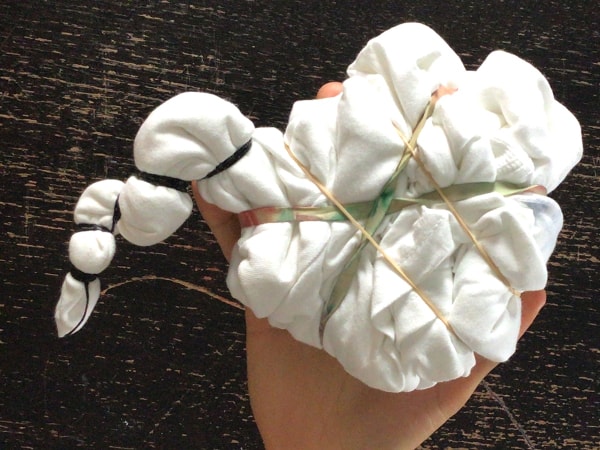
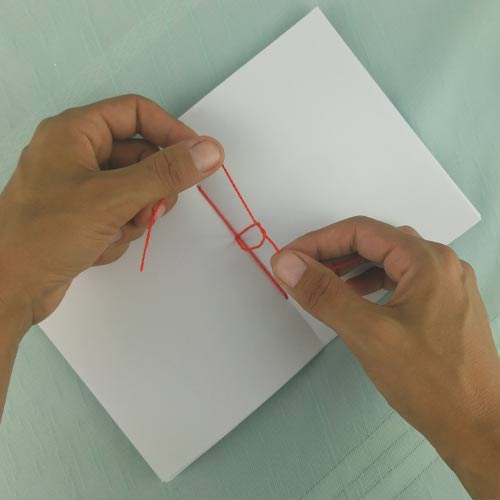
Once the mandala is all tied scrunch up the rest of the t-shirt and hold in place with the thread of with elastics. Try to keep the scrunches even to avoid big blotches of color or white in the final design. I like to keep the triangluar fold together as I scrunch so that the “sunburst” pattern can be seen even in the scrunched part of the shirt.

How To Dye A Mandala

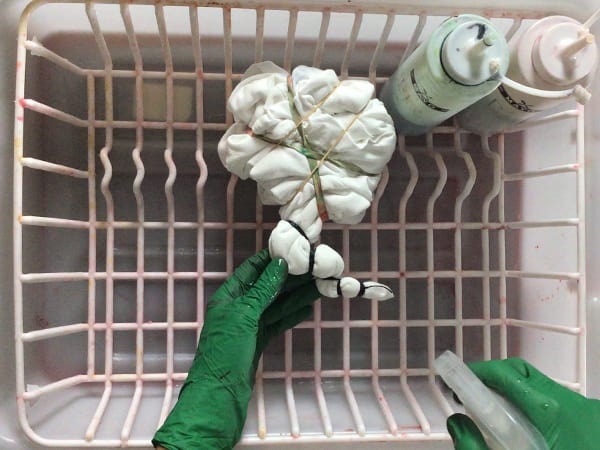
Lightly spray the shirt with water to break the surface tension allowing the water to penetrate the shirt. This will prevent the water from beading on the surface and dripping to areas that you do not want the dye.

Start applying die on one side side of the shirt until you can see the dye bleed through the other side a bit. This will ensure even dye application on those hard to get to inside layers.

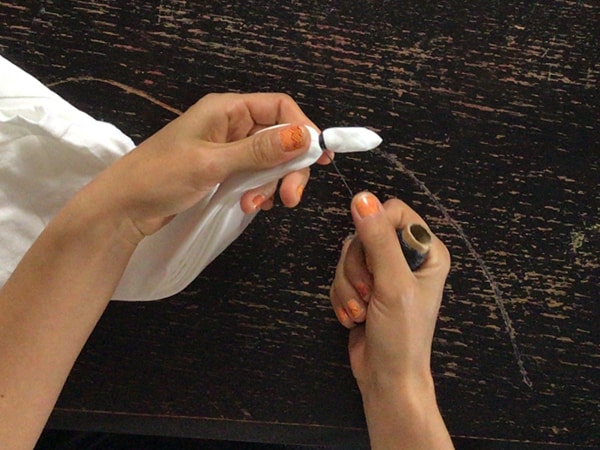
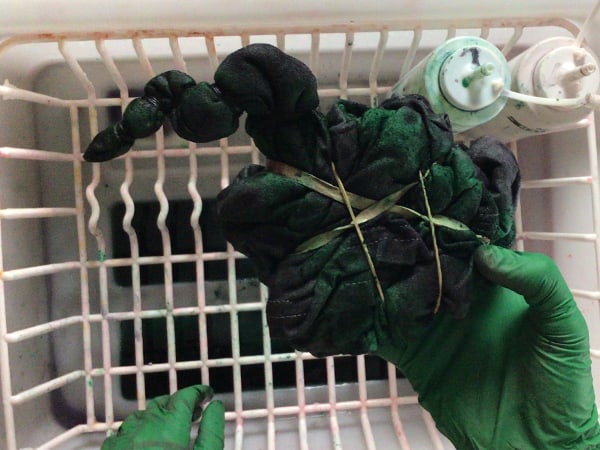
Add the green along the tied parts of the mandala. Apply the dye carefully trying to keep it along the lines as best as possible. Apply some dye and then wait for it to absorb before adding some more and keep in mind that the thicker parts at the top of the triangle will need a lot more dye that the bottom part.

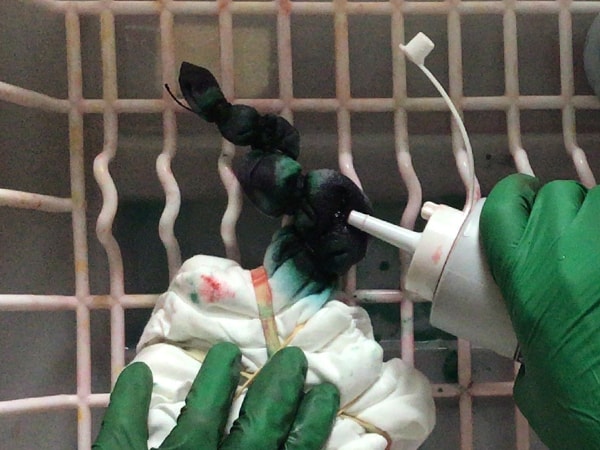
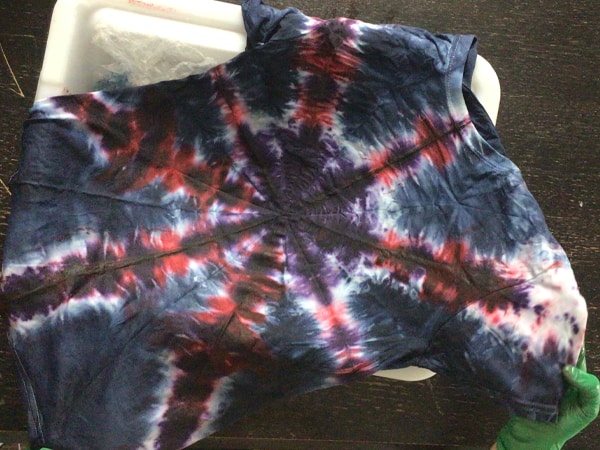
Now add the blue dye on the bulges. Continue to work on only one side and check the other side for when both the blue and green begin seeping through. It is fine to go back and forth between the colors as needed but try to apply the dye as carefully as possible.

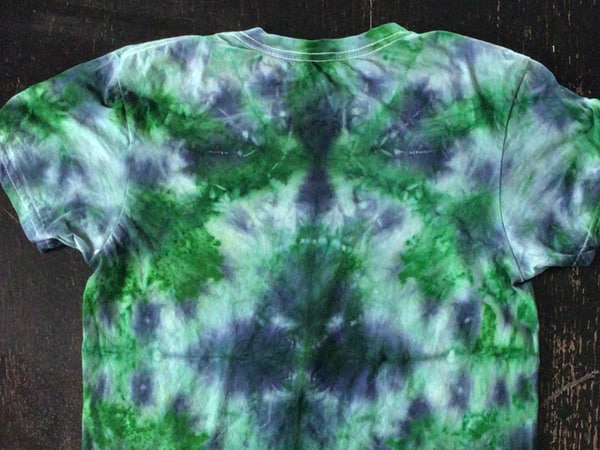
Once you see the dye seeping through in multiple places flip the t-shirt over and repeat the process on the other side.

Dye the rest of the t-shirt. If you want the mandala to stand out more, dye this part only blue. I choose to dye it green and blue in a striped pattern. Whatever pattern you choose to dye here it will not be exact once the shirt is opened since it is all scrunched up.

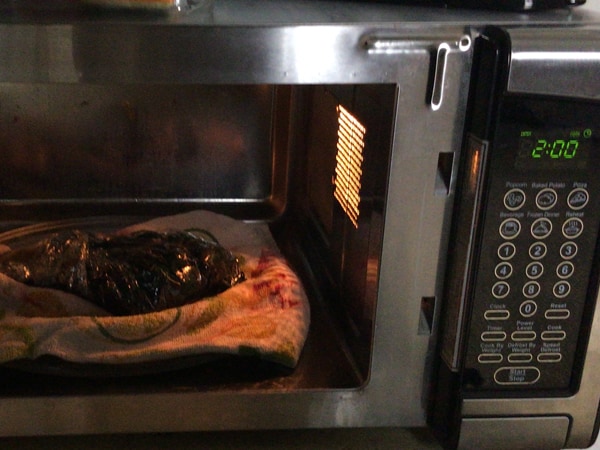
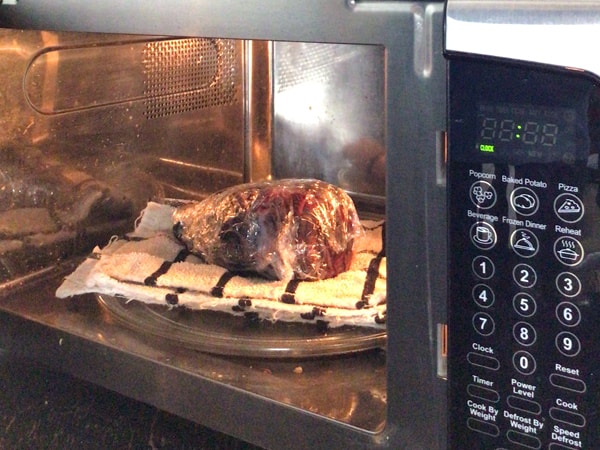
Wrap the wet tied t-shirt in plastic wrap, place it on a cloth, paper towel, or microwave safe dish and heat it for two minutes in the microwave.

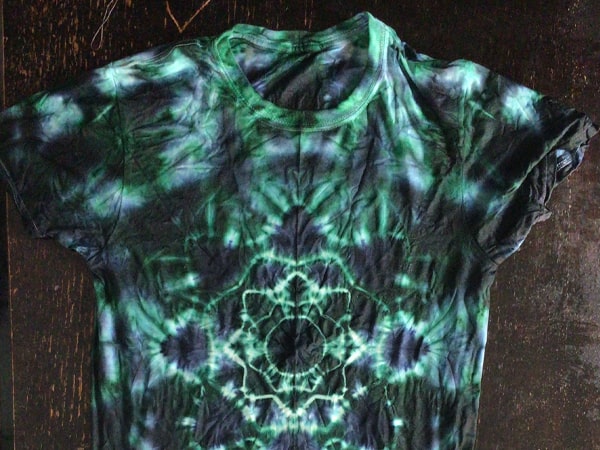
Unwrap to revel your design.

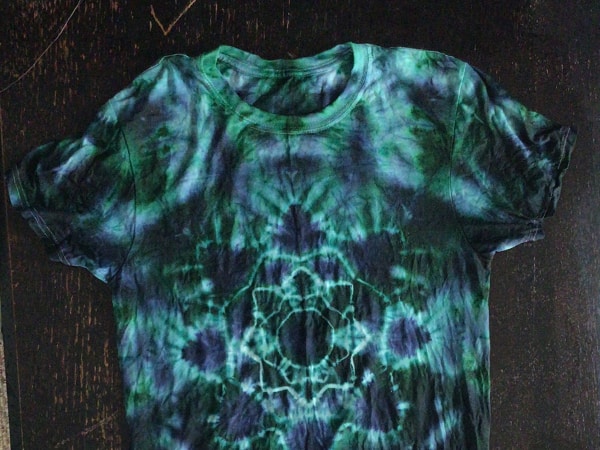
Rinse in cold water until the water runs clear. Rinse more in warm water until that also runs clear. Expect the colors to lighten a bit and to stain the white area. This is normal for Rit dyes.

Wash the shirt in cold water with mild detergent. The shirt may stain anything else it is washed with on the first wash so be cautious.

Front of mandala tie dye t-shirt
Back of mandala tie dye t-shirt

How To Successfully Dye With Rit Dye

Rit dyes* are family-friendly fabric dyes. They do not require any special prep or chemicals to work. Because of this, you can simply grab the fabric you want to dye, tie and dye, and see the final result within hours. This convenience does come with a bit of a drawback though. Rit dyes are not a colourfast as their more professional counterparts.

*This article contains affiliate links. This means if you purchase a product through one of the links with an asterisk (*) I will get a small commission at no extra cost to you. This is how I cover the cost of running a website and can continue to create content. Read more about the companies I work with here.

What is Colorfastness?

Colorfastness refers to the ability for dye to stick to the fabric and stay there even after repeated washes and uses. 

Chemical dyes use chemical process to get the dye to stick to the fabric. The fabric is presoaked in a chemical to activate this process and left to sit to set the dye as the chemicals do their thing. Once the chemical process is finished the excess dye can be washed out. The excess dye will not stain the leftover white areas since the chemical reaction is no longer active and you are left with bright vibrant colors and true white where the dye was not set.

Chemical dyes hold up very well after many washes showing barely any fading at all even after years of use. There are lots of types of chemical dyes each with a slightly different process but this is a general outline of how it works.

Rit dye however stains on contact but needs heat to set the colors well. This means that Rit dyes should either be dyed with very hot dyes, like dip dyeing on the stovetop or heat set after dyeing. Using the microwave to heat set Rit dyes is the easiest and most effect way to do it.

Even after heat setting the dye the colors will run when the excess dye is rinsed out staining the white areas. The colors will also be slightly less vibrant than with chemical dyes and fade faster over time.

Are Rit dyes still worth using?

Yes! You can still get beautiful dye projects with Rit dyes. In fact, Rit dye is my dye of choice for things like family projects, tie dye parties, and tie dye experimentation because of the simplified process and quicker results. They are also the most available dye at local stores making them super easy to get.

How to Get The Best Results With Rit Dyes

Use the right dye for your fabric and follow the instructions

There are different types of Rit dyes for different types of fabric so make sure you are getting the right product for your fabric. It is also important to read the label for additives that will help the dye hold with particular types of fabric.

The two types Rit dyes are:

  • Rit All-Purpose Dye – Used for cotton, rayon, linen, blends with less than 35% synthetic fabric, nylon, silk, and wool. Add salt to dye for cotton, rayon, linen, and blends and add vinegar to dye for nylon, silk, and wool.
  • Rit DyeMore for Synthetic Fibers – Used for for synthetic fabrics like polyester, acrylic, acetate, and blends that contain more than 35% synthetic fibres.

Use compatible colors

Rainbow tie-dye looks awesome when the colors are bright and vibrant but with Rit dyes, it can be very hard to keep the colors from running into each other. Anyone who knows about mixing colors will know that anytime colors from across the color wheel are mixed you will get a muddy color especially in the white areas. Because of this, projects with “incompatible” colors often get a dull or off look. 

Poor color combinations mixing to make “muddy” colors.
Good color combinations that look bright even when colors run together.

Choosing colors that are next to each other on the color wheel will ensure that even as colors run, you will be left with bright “pretty” shades. Rit dyes come in countless shades and can be mixed to get even more shades but a good guideline to start with is these combinations:

  • Blue, purple, red
  • Red, orange, yellow
  • Blue, green, yellow

Some colors run and stain more than others. Red seems to be very bad for staining while the staining with green is pretty mild. This means that combinations of orange, red, and purple work well since both orange and purple still look good when red runs and that experimenting with “risky” color combinations without red will give you better success.

There may be times when you want the colors to be muddy. The muted creamy colors that come from certain color combinations can make great tie dyes. Not everyone wants the bright 60’s style dyes.

Here is a t-shirt I dyed with purple and orange (which mix to give brown) leaving the whites looking a bit muddy but I really like the result.

So carefully consider colors when planning your design and let yourself experiment with color keeping these guidelines in mind.

Carefully rinse the shirt

Always rinse in cold running water first since hot helps the color set. Once the water is running clear you can rinse it in warm color to get a bit more out before washing. I usually do this in the sink but outdoors with a hose works well too.

If you really want the white to be as bright as possible you can keep the shirt tied while doing the first rinse. This will not prevent all the staining but it will help reduce it since a lot of the dye will be removed while the whites are still protected. Once the water is running clean open up the shirt and continue rinsing.

Set realistic expectations

When I started exploring tie dye I watched lots of YouTube tutorials. Although I learned a lot from the many talented teachers, they all were using chemical dyes and that I cannot expect the same final result with Rit dyes. I make sure to plan my project taking into account that the colors will run a bit. In fact, the somewhat muted look of Rit dyes can be an asset making work different but just as beautiful as their chemical dye counterparts.

Heat Set 

Heat setting the dye is a crucial step in the process. Here are three ways to heat set Rit dyes.

Microwave:

Wrap the still wet tied project in plastic wrap and place it on a paper towel or cloth in the microwave. heat it on high for 2 minutes. This is my recommended method because it is super easy and effective. CAUTION: If your project has any metal parts (such as zippers or buttons) then you cannot use this method. 

Steamer:

Wrap the wet, still tied project in newspaper and place it in a steamer with a lid. Boil the water and let the steam heat the project. If water drips on the project you can end up with water spots so make sure the project is covered with a thick layer of newspaper. It is also important that the dyed project does not sit in the water. 

Sun:

Place the wet dyed project in a sealed plastic bag and place it in the hot sun for an entire day. This method will only work on a hot sunny day, it takes a long time, and will not reach the high temperatures of other methods but it still works better than nothing.

Final Thoughts – A Few More Things To Consider When Dying With Rit Dyes

  • Never use anything for dyeing that you will later use for food. This applies to bowls, steamers, pots, tongs, or anything else you use.
  • Rit dyes stain skin and surfaces so wear gloves, old clothes, and protect surfaces.
  • Be cautious on the first few washes after dyeing. The colors may run in the washing machine and stain other items. 

If you want to try out Rit dyes and support my blog consider getting some from Create For Less. I will get a small commission for the sale at no extra cost for you.

Paper Clay Recipe

How to Make Paper Clay

Materials & Tools

  • about 10 pieces of scrap paper ripped into small pieces
  • about 1/2 cup of flour
  • about 1/4 cup of salt
  • water
  • blender
  • strainer and/or cloth

Instructions

1. Blend Paper & Water

Add used scrape paper ripped into small pieces to a blender and mix until a consistent slush forms. Blending paper can be hard on a blender so make sure the paper is ripped into small pieces, that there is adequate water, and that you do not overload the blender.

2. Strain

Use strainer or cloth to remove most of the water from the paper. You still want a mushy mixture at this point You will be able to adjust the mixture in the final step if it is too wet or dry to mold.

3. Add Flour & Salt

Mix flour and salt into paper pulp
Straining excess water out of paper clay

Add flour and salt to the mixture. The salt is used to ensure no mould or bacteria grow during the drying process and the flour makes the mixture easier to form into shapes.

Add more flour if you want it to be more sticky. Add more water if it feels too dry and squeeze out excess water if it is too wet.

It is worth mentioning that the paper clay can be successfully used without any flour but the flour makes it stick better making it easier for kids to work with.

Finished paper clay

4. Shape Paper Clay

Paper clay can be shaped just like any other clay but it has a bit of a crumbly texture (although less so if you add extra flour) making it hard to make very detailed shapes.

It takes a fairly long time to dry making shapes that are very thick undesirable. Consider using some sort of form or filler for large pieces.

Once dried it can be shaped much like wood so details can be added if desired by sanding or carving.

5. Dry

Paper clay can be dried in the oven or in the sun with drying times depending on the thickness of your sculptures.

Drying in the oven should be done on the lowest setting and will take anywhere from a few hours to an entire day. Drying outdoors works best in full sun and can take anywhere from a day to a few days. I often start the drying process in the oven and finish in the sun.

Easy Bookbinding for Kids

If your household is like mine, you have stacks of great kid art. The pictures may end up on the fridge for some time but they soon make way for new art. Give kid art new life by turning it into cute DIY books.

Make cute mini DIY books in under 10 minutes

This craft takes less than 10 minutes and can be made with items you likely have around the house. The books are useful as journals, note books, to-do lists, or sketch books and make great gifts. This craft is also a great introduction to the wonderful world of bookbinding, an art form that is widely under appreciated.

Use Paper you already have around the house

Although I planned this craft to be made with kid art it can obviously be made with a wide range of papers. Be creative and use any clean waste paper you have around the house.

How to make a DIY mini book

Materials & Tools

Instructions

  1. Cut cover page
  2. Cut pages
  3. Punch holes
  4. Sew
  5. Trim

1. Cut cover page

Cut a rectangle out of the cover paper and fold in half. Cut any size rectangle to make larger or smaller books. Run the card or bone folder along the fold to sharpen the crease.

2. Cut pages

Use the cover page as a template to cut 5 to 10 rectangles from the paper for pages. Stack the pages and fold in half. Use the card or bone folder to sharpen the crease.

3. Punch holes

Place the pages inside the cover paper and use the push pin or awl to punch three holes along the crease, one in the centre and two on either side. Make sure the holes are large enough for the needle to easily pass through them. You can twist the push pin around inside the hole to make it bigger if needed.

4. Sew

Thread about 30 cm of embroidery thread into the needle. Thread the needle through the middle hole starting on the inside of bookmaking sure the tail of the thread does not get pulled through the book.

Thread the needle in the top hole from the outside then run along the crease and through the bottom hole.

Finally thread the needle through the middle hole again, this time from the outside. Remove the needle from the thread and tie the two end in a double knot close to the crease. Trim the end close to the knot leaving a small bit of thread so the knot does not come undone.

5. Trim

Use scissors to trim edges of book if needed.

How to set this craft up for little kids

After many events where I have made mini books with groups of kids, I have noticed a wide range of interest in the bookmaking process but a nearly universal interest in using the finished books. Although making a book from start to finish takes under 10 minutes, it is a good idea to consider your child’s attention span and interests and prepare ahead of time to shorten the craft if you think it is best.

Little kids, in particular, can lose patience on a craft like this one that has fixed steps and requires adult guidance. If you know your child is unlikely to enjoy the whole process you can prepare the book cover and pages ahead of time and punch the holes leaving only the sewing to do together. This allows the child to be involved in the making of the book but quickly gets to the open-ended creative work of drawing in the book.